
Convert VHS to Digital: Revive Your Treasured Video Memories
Preserve your precious VHS tapes before they degrade. EachMoment's pro VHS to digital service revives your memories. Start with a £10 deposit for a free Memory Box. We use top equipment, include free cloud storage, and ensure your memories last. Share on USB, DVD, or your secure Cloud Album.
- Complimentary VHS tape cleaning & basic restoration included as standard
- Advanced digitisation using broadcast-quality video processing equipment
- Free cloud storage included for simple sharing and access
- Trusted service provider for families and media professionals across the UK
- Over 600+ 5-star customer testimonials
*Order before midday for Memory Box next-day delivery. Free secure 3-way courier & Memory Box for orders over £50.00
Industry leading digitisation, trusted by...


Memories we've restored & preserved
3 Easy Steps To Preserve Your Precious Memories
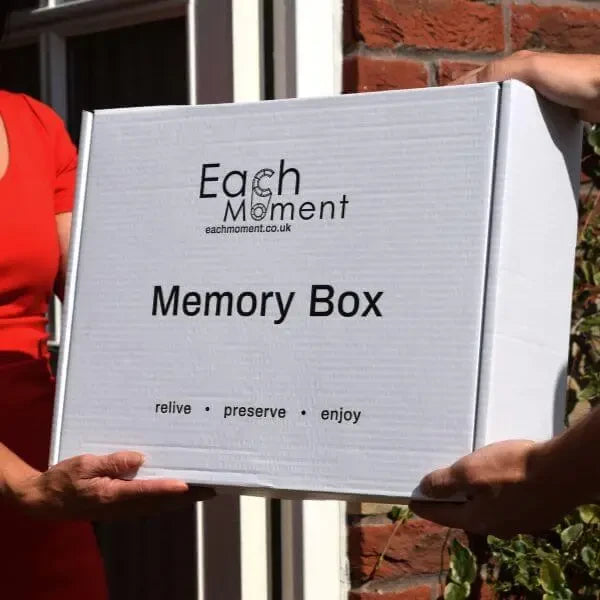
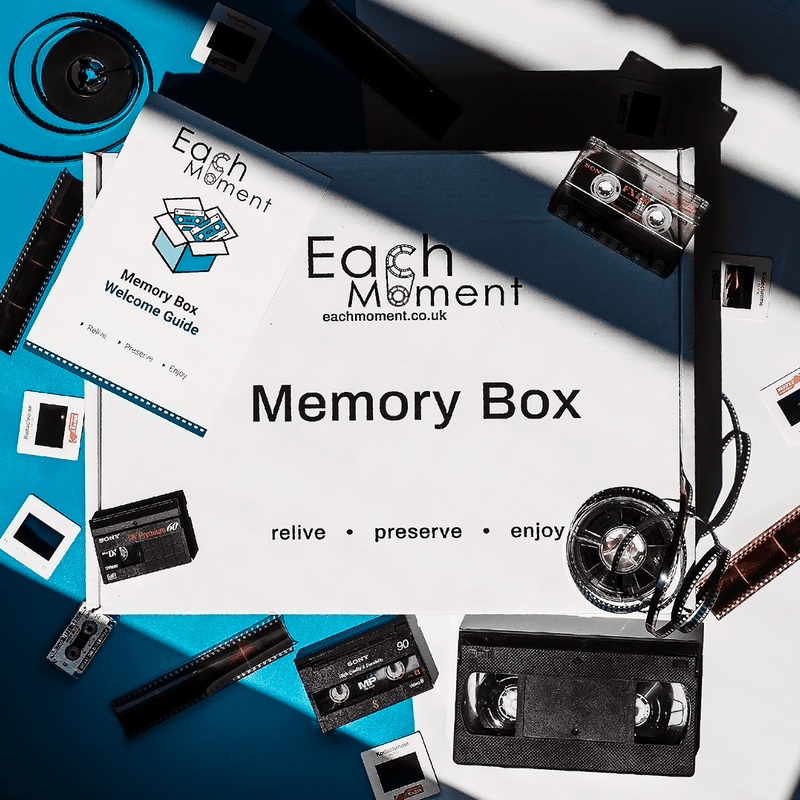
1. Order Your Free Memory Box – Secure Your Memories with a £10 Deposit
Embark on your journey to preserve your VHS memories by ordering your complimentary, robust Memory Box today. A small £10 deposit is all it takes to begin. Order before 12 pm, and we'll dispatch your Memory Box for next-day delivery, ready for you to carefully pack your VHS tapes. There's no need to worry about dust or minor wear; our expert team will handle the cleaning. Once your Memory Box is filled, simply arrange a free, secure courier collection through our user-friendly online portal.
2. Expert VHS Digitisation & Quality Enhancement Process
Upon arrival at our specialist lab, your VHS tapes are treated with the utmost care. Each tape undergoes a detailed process of professional cleaning, restoration, and high-resolution digitisation using broadcast-standard equipment. Our skilled technicians meticulously convert your tapes to digital formats, optimising colour and audio for modern viewing. From initial tape cleaning to essential repairs, we include these services at no extra charge, ensuring the highest quality digital conversion of your cherished family moments.
3. Relive, Share, and Safeguard Your Digitised Memories
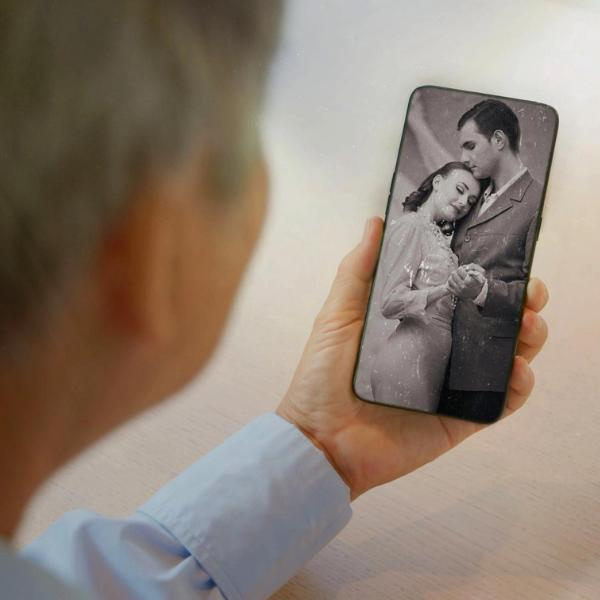
Rediscover the magic of your VHS memories, now in a vibrant digital format. We return your original tapes alongside your newly digitised videos in your preferred format – convenient USB drive, classic DVD, or accessible cloud storage. Effortlessly share your treasured moments with family and friends, across any distance and across generations, knowing your memories are securely preserved for the future. Enjoy easy playback on modern devices including Smart TVs, laptops, tablets, and smartphones.
1. Order Your Free Memory Box – Secure Your Memories with a £10 Deposit
Embark on your journey to preserve your VHS memories by ordering your complimentary, robust Memory Box today. A small £10 deposit is all it takes to begin. Order before 12 pm, and we'll dispatch your Memory Box for next-day delivery, ready for you to carefully pack your VHS tapes. There's no need to worry about dust or minor wear; our expert team will handle the cleaning. Once your Memory Box is filled, simply arrange a free, secure courier collection through our user-friendly online portal.
2. Expert VHS Digitisation & Quality Enhancement Process
Upon arrival at our specialist lab, your VHS tapes are treated with the utmost care. Each tape undergoes a detailed process of professional cleaning, restoration, and high-resolution digitisation using broadcast-standard equipment. Our skilled technicians meticulously convert your tapes to digital formats, optimising colour and audio for modern viewing. From initial tape cleaning to essential repairs, we include these services at no extra charge, ensuring the highest quality digital conversion of your cherished family moments.
3. Relive, Share, and Safeguard Your Digitised Memories
Rediscover the magic of your VHS memories, now in a vibrant digital format. We return your original tapes alongside your newly digitised videos in your preferred format – convenient USB drive, classic DVD, or accessible cloud storage. Effortlessly share your treasured moments with family and friends, across any distance and across generations, knowing your memories are securely preserved for the future. Enjoy easy playback on modern devices including Smart TVs, laptops, tablets, and smartphones.

Excellent
4.7/ 5
reviews
Long lost treasures
EachMoment haven't just 'unlocked' the memories on the tape, they've also cleaned up the sound and picture, boosted the volume and the running speed is now correct. It's like stepping back in time, our dearly departed parents and other relatives - then so young - each having a turn at talking, singing at the camera. It sends warm shivers down the spine! I can't recommend highly enough. EachMoment haven't just 'unlocked' the memories on the tape, they've also cleaned up the sound and picture, boosted the volume and the running speed is now correct. It's like stepping... EachMoment haven't just 'unlocked' the memories on the tape, they've also cleaned up the sound and picture, boosted the volume and the running speed is now correct. It's like stepping back in time, our dearly departed parents and other relatives - then so young - each having a turn at talking, singing at the camera. It sends warm shivers down the spine! I can't recommend highly enough.
Catherine, 6 hours ago
After trying to remember lost loved ones
After trying to remember lost loved ones voices, we found old video tapes and after searching the internet for a company to try and digitalise them we came across each moment. They managed to clean and restore and put them all on a memory stick that we can watch for ever now! I’ve loved watching them, absolutely fantastic so would highly recommended this company. After trying to remember lost loved ones voices, we found old video tapes and after searching the internet for a company to try and digitalise them we came across each... After trying to remember lost loved ones voices, we found old video tapes and after searching the internet for a company to try and digitalise them we came across each moment. They managed to clean and restore and put them all on a memory stick that we can watch for ever now! I’ve loved watching them, absolutely fantastic so would highly recommended this company.
Kelly M, 22 hours ago
Last night I heard my grandmother's…
Last night I heard my grandmother's voice reading a Christmas poem for the first time in over 30 years. She passed away in 1990, and after her death I found a cassette tape, mangled in a tape player. I kept it, hoping one day to find a way to restore it. EachMoment restored that tape, and this year on the day of her birthday, her great-grandchildren will hear her voice for the first time, and her children, now grandparents themselves, will hear their mother's voice again as well. There are no words that can adequately express my gratitude. Last night I heard my grandmother's voice reading a Christmas poem for the first time in over 30 years. She passed away in 1990, and after her death I found... Last night I heard my grandmother's voice reading a Christmas poem for the first time in over 30 years. She passed away in 1990, and after her death I found a cassette tape, mangled in a tape player. I kept it, hoping one day to find a way to restore it. EachMoment restored that tape, and this year on the day of her birthday, her great-grandchildren will hear her voice for the first time, and her children, now grandparents themselves, will hear their mother's voice again as well. There are no words that can adequately express my gratitude.
Laura P, yesterday
EachMoment rescued 30 Hi8 analogue…
EachMoment rescued 30 Hi8 analogue camcorder tapes. 45 hours of family memories. I could not plly them on my camcorder and thought I had lost them forever. Some of the tapes are over 30yrs old.The technical department has managed to extract restore and digitise nearly everything!Now all those memories are available to the whole family to share on whatsapp and stream on our TV whenever they come round! Love it. EachMoment rescued 30 Hi8 analogue camcorder tapes. 45 hours of family memories. I could not plly them on my camcorder and thought I had lost them forever. Some of the... EachMoment rescued 30 Hi8 analogue camcorder tapes. 45 hours of family memories. I could not plly them on my camcorder and thought I had lost them forever. Some of the tapes are over 30yrs old.The technical department has managed to extract restore and digitise nearly everything!Now all those memories are available to the whole family to share on whatsapp and stream on our TV whenever they come round! Love it.
Kevin N, yesterday
Long ago cherished memories
The items we sent to be converted from VHS tapes to DVD's, an Audio tape cassette to CD and negatives and slides to a memory stick were excellently done. Everyone who has seen and heard the finished articles has been very impressed. Excellent value for money and has been recommended several times. The items we sent to be converted from VHS tapes to DVD's, an Audio tape cassette to CD and negatives and slides to a memory stick were excellently done. Everyone... The items we sent to be converted from VHS tapes to DVD's, an Audio tape cassette to CD and negatives and slides to a memory stick were excellently done. Everyone who has seen and heard the finished articles has been very impressed. Excellent value for money and has been recommended several times.
Theresa, 2 days ago
Excellent service
It is very easy to place an order as everything is organised by EachMoment. I ordered the digitisation of a large quantity of old Super 8 Cine film, Video 8 tapes, VHS tapes and photographic negatives. The process took about 3 weeks due to the quantity but it was well worth waiting for. I was absolutely delighted by the results and I feel reconnected with my past and people who were in my life as far back as the early 1950s. Incredible ! It is very easy to place an order as everything is organised by EachMoment. I ordered the digitisation of a large quantity of old Super 8 Cine film, Video 8... It is very easy to place an order as everything is organised by EachMoment. I ordered the digitisation of a large quantity of old Super 8 Cine film, Video 8 tapes, VHS tapes and photographic negatives. The process took about 3 weeks due to the quantity but it was well worth waiting for. I was absolutely delighted by the results and I feel reconnected with my past and people who were in my life as far back as the early 1950s. Incredible !
Mauro S H, 2 days ago
Excellent.
I sent in a large number of old slides and video tapes to be digitised some of which were in very poor condition. Each Moment did a fantastic job of capturing the images digitally for me. Professional service, friendly helpful staff. Will be using again and would recommend. I sent in a large number of old slides and video tapes to be digitised some of which were in very poor condition. Each Moment did a fantastic job of... I sent in a large number of old slides and video tapes to be digitised some of which were in very poor condition. Each Moment did a fantastic job of capturing the images digitally for me. Professional service, friendly helpful staff. Will be using again and would recommend.
Marcus H, 3 days ago
Wonderful service and wonderful results
I bought a mixed box of old tapes and cassettes, some in poor condition and the team at Each Moment worked their magic.I now have many happy memories that would otherwise have been lost.They are a brilliant company, professional and efficient and I wouldn’t hesitate to recommend them, or urge others to salvage memories before their lost! I bought a mixed box of old tapes and cassettes, some in poor condition and the team at Each Moment worked their magic.I now have many happy memories that would... I bought a mixed box of old tapes and cassettes, some in poor condition and the team at Each Moment worked their magic.I now have many happy memories that would otherwise have been lost.They are a brilliant company, professional and efficient and I wouldn’t hesitate to recommend them, or urge others to salvage memories before their lost!
Amanda, 3 days ago
A lot of videocam footage transferred quickly.
I needed to get a lot of videocam cassette footage transferred as a surprise for a 70th birthday at relatively short notice. The team were very helpful when approached and were able to get me online access to the 39 tapes before I received the USBs so I could select specific videos for the party. One tape was also returned and cleaned up very quickly when it was found to have some tracking interference. We now have some great memories restored to share with the family and our grandchildren. I needed to get a lot of videocam cassette footage transferred as a surprise for a 70th birthday at relatively short notice. The team were very helpful when approached and... I needed to get a lot of videocam cassette footage transferred as a surprise for a 70th birthday at relatively short notice. The team were very helpful when approached and were able to get me online access to the 39 tapes before I received the USBs so I could select specific videos for the party. One tape was also returned and cleaned up very quickly when it was found to have some tracking interference. We now have some great memories restored to share with the family and our grandchildren.
Mark F, 3 days ago
Ready to Convert Your VHS Tapes to Digital Format?
Don't risk losing your irreplaceable VHS memories to time and degradation. Our professional VHS to digital conversion service provides a straightforward, secure, and premium solution to safeguard your precious moments. Order your free Memory Box today for just a £10 deposit and take the first step towards preserving your family history for years to come.
Order your protective Memory Box before midday, and we guarantee dispatch on the same day for next working day delivery, enabling you to promptly and securely send us your VHS tapes.

Help us to help you keep your digital memories organised! Provide us with tape details and we will create custom titles for your digital video files, making it simple to locate and share specific events with family and friends.

Your Memory Box includes a pre-paid return shipping label and protective packaging, ensuring the safe and fully tracked transit of your original VHS tapes and your new digital media back to your doorstep via our reliable courier partner.

Stay informed at every stage with our real-time online order tracking system. Monitor your Memory Box's journey from collection, throughout the digitisation process in our lab, to its secure return delivery to you.

We go beyond simple transfer. Our service includes professional cleaning and essential restoration of your VHS tapes, enhancing colour and audio using broadcast-quality equipment for optimal digital results, all at no additional cost to you.

We are confident you will be delighted with your newly digitised VHS tapes. We guarantee the quality of our service and offer a full refund if you are not completely satisfied. Your peace of mind and treasured memories are our highest priority.
Free Secure Collection & Return | Professional VHS Restoration | Free Personalised File Titles | Free Cloud Storage
“The quality of the videos and audio was incredible. I would 100% recommend EachMoment to anyone!” — Abby
Why a Protective Memory Box is Crucial for Your VHS Tapes
Our Memory Box is more than just packaging; it's the safest journey for your VHS tapes to digital preservation. Specifically designed to protect delicate media, this robust, crush-proof box ensures your tapes arrive at our lab in perfect condition. Order before midday, and your Memory Box, complete with an easy-to-follow Welcome Guide, will be delivered the next working day. Simply pack your VHS tapes – regardless of their current condition – and entrust our specialists to revitalise them. We have invested significantly in perfecting the secure handling of fragile media, partnering with the same trusted couriers used for transporting sensitive official documents. Our proven track record speaks for itself: zero tapes lost or damaged in transit, ever. Your family's irreplaceable memories deserve nothing less than this dedicated level of protection, from initial collection to expert digitisation and safe return.
Your Cherished Memories, Securely Preserved for the Future
-
- Professional digitisation halts the natural deterioration of VHS tapes, preventing further loss of picture and sound quality.
- Digital conversion future-proofs your memories, ensuring ongoing compatibility with modern technology for generations to come.
- We utilise a high-security courier service, the same service trusted for transporting university examination papers and passports, providing ultimate peace of mind.
- Our experienced in-house team employs a meticulous tracking system, carefully monitoring each individual tape throughout the entire digitisation process.
- Easily track your VHS tapes' journey from your doorstep to our specialist lab via your smartphone, computer, or by contacting our dedicated phone support.
- Your valuable VHS tapes are transported in our robust, crush-resistant Memory Box, custom-engineered for maximum protection against physical damage.
Broadcast Quality VHS Digitisation & Professional Restoration
With extensive experience in professional media conversion, EachMoment delivers industry-leading VHS digitisation services. Our dedicated, UK-based lab is equipped with broadcast-quality VCRs and commercial-grade recording equipment, ensuring the highest standard of digital transfer for your home movies and precious recordings. Each VHS tape undergoes a comprehensive physical cleaning and restoration process before digitisation commences. By meticulously removing dust, mould spores, and surface contaminants, we enhance the integrity of the tape and its analogue signal, a vital step often overlooked by other services, which can compromise the final digital quality. We invest the extra time and meticulous care to ensure your memories are preserved at their absolute best possible quality.
Professional cleaning and essential restoration are included as standard with every VHS to digital conversion order.
Frequently Asked Questions About VHS to Digital Conversion Services
Could you outline the complete VHS to digital conversion process at EachMoment?
A: Preserving your VHS tapes with EachMoment is a simple, secure, and streamlined process:
1. Order & Receive Your Memory Box: Use our intuitive online quote tool, select 'VHS tapes', and pay just a £10 deposit to get started. Your free, reinforced Memory Box is promptly dispatched for next-day delivery*.
2. Pack Your VHS Tapes Securely: Carefully pack your tapes into the Memory Box, utilising the protective materials provided. No need to pre-clean your tapes; our experts will handle that!
3. Arrange Secure Courier Collection: Schedule a free, secure courier collection easily via our online portal. Your Memory Box is then safely transported to our UK headquarters.
4. Tape Assessment & Invoice (or Refund): Upon arrival at our lab, our expert technicians carefully assess your tapes and issue a clear online invoice for any adjustments or a refund if applicable.
5. Professional Restoration & Digitisation: Following secure payment, your VHS tapes undergo professional cleaning, restoration, and high-resolution digitisation using broadcast-quality equipment and techniques.
6. Rigorous Quality Control & Digital Preparation: Your newly digitised videos undergo stringent quality checks and are meticulously prepared for your chosen output format (Cloud Album, USB drive, or DVD).
7. Secure Return of Originals & Digital Copies: Your original VHS tapes and your digital copies are securely returned to you via our trusted courier service.
8. Relive & Share Your Treasured Memories: Enjoy and easily share your revitalised memories on any digital device!
*Order before 12 pm for next-day Memory Box delivery. Free Memory Box + free 3-way secure courier for orders over £50.00.
Which specific VHS tape formats are compatible with your digital conversion service?
A: We expertly convert a comprehensive range of VHS tape formats to digital, including:
1. Standard VHS
2. S-VHS
3. VHS-C
4. S-VHS-C
5. Betamax
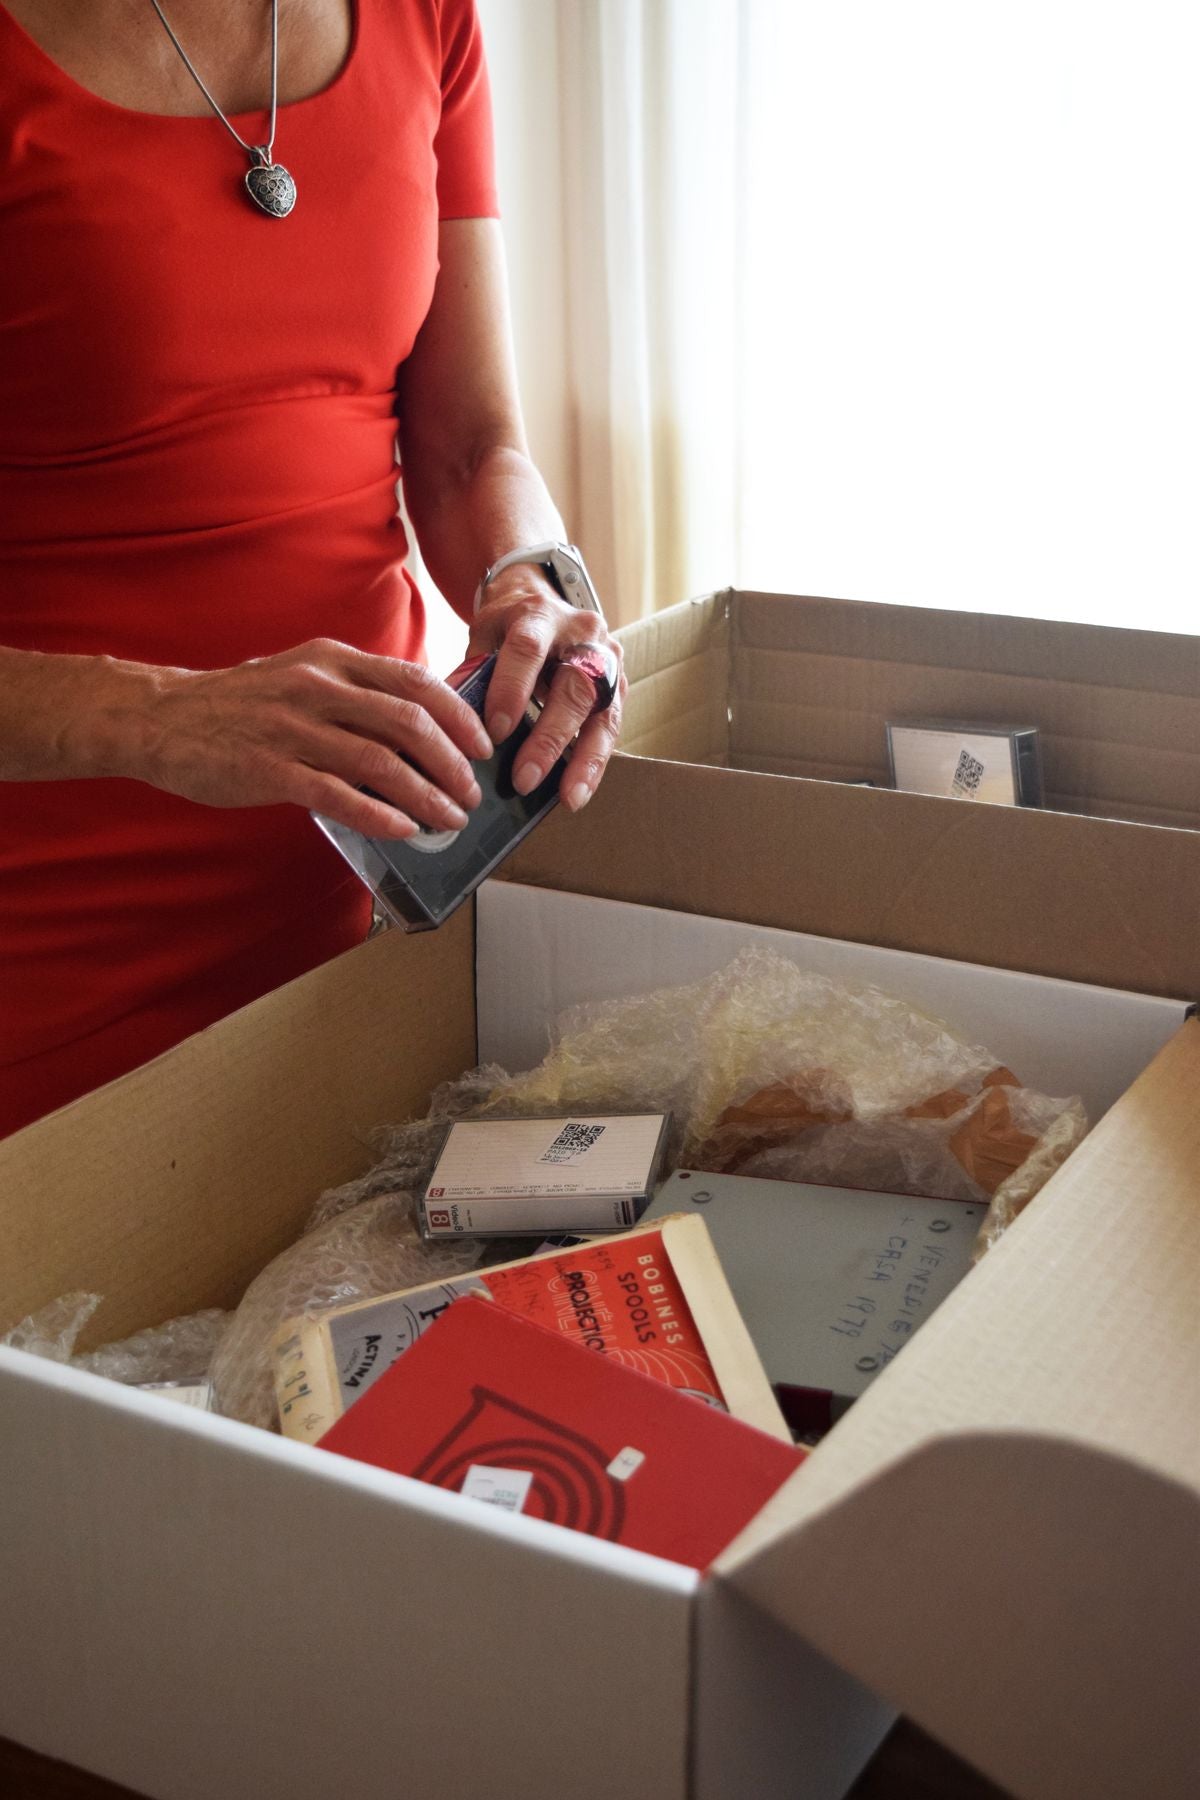
Unsure of your exact tape format? Don't worry if you are unsure! Simply send us your tapes securely packaged in our Memory Box, and our experienced specialists will accurately identify each format upon arrival at our lab. We are equipped to handle VHS tapes in virtually any condition, including tapes that are scratched, faded, or showing signs of minor damage.
What if I discover I have more VHS tapes than my initial estimate when placing my order?
A: It's a common occurrence to find more tapes than initially anticipated! Our streamlined process is specifically designed for flexibility to accommodate this:
1. Provide an Initial Estimate & Start: Use our user-friendly online quote tool to provide your best estimate of the number of VHS tapes you have and pay the £10 deposit to receive your free Memory Box.
2. Pack All Your VHS Tapes: When your Memory Box arrives, simply pack all of your VHS tapes, even if the quantity exceeds your initial estimate.
3. Precise Assessment at Our Specialist Lab: Our expert technicians will accurately count and thoroughly assess all tapes upon secure arrival at our dedicated lab.
4. Transparent Invoice or Refund Process: We will then send you a clear online invoice for any additional tapes converted or issue a refund if applicable. You only pay for the final, accurately counted number of tapes after we have safely received and professionally assessed them. This ensures you can send all your tapes without needing to overestimate upfront and only pay for the precise number of tapes we successfully convert for you.
In what ways will I receive my newly digitised VHS videos after conversion?
A: We provide multiple convenient and versatile options for you to receive your newly digitised VHS videos, ensuring they are accessible in your preferred format:
1. Complimentary Cloud Album (Included with Every Order):
* Enjoy instant online access to your digitised videos via a secure Cloud Album.
* Effortlessly share your memories with family and friends across the globe.
* Stream your videos on any device – including smartphones, tablets, computers, and Smart TVs.
* Benefit from secure cloud backup of your precious memories, protecting them against data loss.
2. Premium Crystal USB Drive (Popular Choice):
* Receive your digitised videos on an elegant crystal USB drive, presented in a beautiful gift box.
* This option is ideal for gifting your memories to loved ones or for special occasions.
* Provides high-quality digital files compatible with all modern playback devices.
3. Robust Classic USB Drive (Durable Backup Option):
* Choose a durable steel USB drive for a robust and long-lasting physical backup of your memories.
* Offers reliable long-term storage for your valuable digital video files.
4. Traditional DVD Set (Classic Playback Format):
* Opt for a DVD set for playback on any standard DVD player, offering compatibility with older TVs and systems.
* A familiar and user-friendly format, especially for those less comfortable with newer technology.
* Includes custom DVD menus and chapter markers for easy navigation of your videos.
Many of our customers choose a combination of these options, such as utilising the Cloud Album for immediate sharing and selecting a Premium USB drive for secure safekeeping and thoughtful gifting.
What measures do you take to guarantee the safety and security of my irreplaceable VHS tapes throughout the conversion process?
A: The safety and security of your VHS tapes are our absolute top priority. We have implemented a robust, multi-layered security system to ensure their complete protection:
1. Secure Memory Box Transport System:
* Our proprietary Memory Box is engineered to be crush-proof, providing maximum protection for your tapes against physical damage during transit.
* Ensures your tapes remain securely in place, preventing movement and potential damage.
* We are proud to maintain a perfect track record of zero tapes damaged in transit since implementing our Memory Box system.
2. Premium, Tracked Courier Service:
* We partner with a premium division of a national courier service, renowned for handling highly sensitive materials, including examination papers and passports.
* Benefit from real-time tracking of your Memory Box from collection at your doorstep to secure return delivery.
* We have an impeccable history of zero lost items since the inception of our secure courier service.
3. State-of-the-Art Lab Security & Handling Protocols:
* Upon arrival at our specialist lab, each VHS tape is assigned a unique QR code for meticulous tracking throughout the digitisation process.
* Our lab facility is under 24/7 monitoring and is climate-controlled to ensure optimal storage conditions for your tapes.
* All tapes are handled exclusively by our professionally trained technicians, adhering to strict security protocols.
* We conduct regular maintenance and calibration of our digitisation equipment to guarantee the safe handling of your delicate media.
We are immensely proud to state that we have never lost or damaged a single customer's VHS tape. Your cherished memories are in the safest possible hands with EachMoment.
What if I am uncertain about the specific content recorded on some of my older VHS tapes?
A: It is perfectly understandable if you are unsure about the exact content on all of your older VHS tapes! Here is our straightforward and customer-friendly approach to this situation:
1. Full Refund for Blank Tapes: If, upon assessment at our lab, a VHS tape is found to be completely blank, you will automatically receive a full refund for the digitisation cost of that particular tape.
2. We Professionally Digitise All Recoverable Footage: If there is any recoverable footage present on a tape, we will proceed to professionally digitise it, regardless of:
* The length of the recorded footage (even very short clips or segments).
* Whether the content is unlabeled or of unknown origin.
* If there are mixed recordings or multiple events captured on a single tape.
Many of our customers have been delighted to rediscover long-forgotten family moments and precious memories that they were not even aware were still preserved on their old VHS tapes. Our professional restoration process can even reveal details and improve clarity that were not easily visible when originally viewing the tapes on standard VHS playback equipment!
Is it possible for you to restore VHS tapes that are visibly damaged or have mould contamination?
A: Yes, absolutely! We specialise in the professional restoration of aged and damaged VHS tapes, including those affected by mould. Here is a summary of the types of damage we can typically address:
* VHS tapes exhibiting fading or colour shift.
* Tapes that are scratched or physically marked.
* VHS tapes that have become brittle or stiff over time.
* Tapes contaminated with surface dirt or dust accumulation.
* VHS tapes that have been previously spliced or repaired.
* Tapes that have sustained water damage.
* VHS tapes showing signs of mould contamination (in the majority of cases).
Our Comprehensive Restoration Process:
1. Detailed Expert Assessment: Each VHS tape is meticulously evaluated by our experienced media specialists to determine the extent and nature of any damage.
2. Professional Cleaning & Restoration Techniques: We utilise broadcast-quality VCRs and commercial-grade restoration equipment. Tapes undergo physical cleaning to carefully remove dust, surface mould, and contaminants, significantly enhancing both the tape integrity and the quality of the analogue signal. We also address common issues such as 'sticky shed syndrome' if present in older tapes.
3. Archive-Grade Restoration Technology: We employ specialised, archive-grade cleaning and restoration technologies and solutions to maximise the recovery of your valuable video content.
4. Necessary Physical Repairs: Our technicians perform any necessary physical repairs, such as re-splicing broken tapes or addressing tape stiffness issues to ensure smooth playback during digitisation.
5. High-Quality Digitisation & Stringent Quality Checks: Following the restoration process, tapes are digitised with meticulous attention to detail, and the resulting digital files undergo rigorous quality control checks to ensure optimal results.
No Additional Restoration Charges: All basic restoration procedures are included within our standard VHS to digital conversion pricing. In the rare event that a VHS tape is deemed beyond successful recovery (this occurs in less than 1% of cases), you will receive a full refund for the digitisation cost of that tape. We strongly advise that the sooner you choose to digitise your VHS tapes, the higher the likelihood of successful preservation and restoration of your precious memories!
What is the typical turnaround time for your VHS to digital conversion service?
A: We offer two distinct processing options for VHS digitisation to cater to varying customer needs:
1. Standard Processing Service:
* The typical turnaround time for our standard processing service is approximately 3-4 weeks from the date your Memory Box securely arrives at our digitisation lab.
* This timeframe encompasses thorough tape inspection, professional cleaning and restoration, high-quality frame-by-frame digitisation, and comprehensive quality control procedures.
* Each individual VHS tape receives dedicated attention and meticulous handling throughout the entire process to ensure the highest quality results.
2. Expedited Rush Processing Service (Optional):
* For customers requiring faster turnaround, we offer an optional Rush Processing service, which expedites the completion of your order to within 1-2 weeks.
* Despite the faster processing time, our Rush Processing service maintains the same high standards of restoration and digitisation quality as our standard service.
* Rush Processing is ideally suited for urgent needs, such as upcoming special occasions or time-sensitive projects.
The overall processing time can vary depending on several factors, including:
* The total number of VHS tapes included in your order.
* The general condition of the tapes (tapes requiring more extensive restoration work may take slightly longer).
* Our current lab workload and processing queue.
We provide order tracking updates throughout the process, and you can conveniently monitor the progress of your tapes via our secure online Status Tracking system. We always prioritise delivering the highest possible quality and never compromise the careful handling that your precious memories deserve, regardless of the chosen processing speed.
Will I be able to easily watch my newly digitised VHS videos on my television?
A: Yes! We make it exceptionally easy for you to watch your newly digitised VHS videos on virtually any television set:
Smart TV Playback Options:
* Direct Cloud Album Streaming: Access and stream your videos directly from your complimentary Cloud Album app on compatible Smart TVs for convenient viewing.
* Simple USB Drive Playback: For maximum ease of use, simply plug in your USB drive (either Premium Crystal or Classic Steel) into your Smart TV's USB port. Then, use your TV's built-in media player to effortlessly browse and watch your digitised videos.
Options for Standard (Non-Smart) TVs:
* HDMI Connection via External Device: Connect any HDMI-equipped device, such as a laptop, desktop computer, or dedicated media player, to your standard TV using an HDMI cable. You can then play your digital video files from the connected device.
* DVD Playback using DVD Player: If you choose to receive your digitised videos on DVD, simply use your DVD set in any standard DVD player that is connected to your television for familiar and straightforward playback.
Many families and individuals greatly enjoy gathering together to watch their newly digitised memories on their TVs, reliving those special moments in a comfortable and shared viewing environment. Modern televisions will display your digitised VHS videos with significantly enhanced clarity and picture quality compared to the original VHS tape playback!
Could you explain in detail what your '3-way secure courier' service encompasses?
A: Our comprehensive '3-way secure courier' service is designed to provide complete peace of mind and maximum convenience throughout your VHS digitisation order. It meticulously covers three essential stages of the process:
1. Secure Memory Box Delivery to Your Address: We securely deliver your complimentary, specially engineered Memory Box directly to your home address, ready for you to carefully and safely pack your VHS tapes at your own pace.
2. Reliable Memory Box Collection from Your Location: Once you have packed your tapes, our secure courier service will collect your filled Memory Box directly from your doorstep at a pre-arranged time, ensuring safe and tracked transportation to our specialist digitisation lab.
3. Guaranteed Return Delivery to Your Doorstep: After the digitisation process is complete, we securely return your original VHS tapes, along with your chosen digital copies (whether on USB drive, DVD set, or access to your Cloud Album), back to your address via the same trusted and tracked courier service.
This all-inclusive, 3-way service guarantees the safe, secure, and fully tracked transportation of your precious memories throughout the entire VHS to digital conversion journey, from your home and back again.
Is your advertised courier service genuinely provided free of charge to customers?
A: Yes, absolutely! Our premium 3-way secure courier service is indeed provided completely free of charge to all VHS digitisation orders where the total digitisation service spend is £50.00 or greater. For smaller orders with a total digitisation spend below £50.00, a nominal charge of £25 applies to cover the comprehensive 3-way secure courier service. This means that the vast majority of our customers benefit from completely free, secure, and highly convenient collection and return delivery of their valuable VHS tapes, making the entire process as seamless and cost-effective as possible.
What are the applicable charges for your optional Rush Processing service?
A: Our optional Rush Processing service is available for customers who require their VHS tapes to be digitised more quickly than our standard processing timeframe. The Rush Processing fee is structured on a tiered basis, directly related to your total order spend:
| Total Order Spend | Rush Processing Fee |
|---------------------|---------------------|
| Orders under £50 | £20.00 |
| Orders of £50 or more | £20.00 |
| Orders of £100 or more | £50.00 |
| Orders of £200 or more | £75.00 |
| Orders of £300 or more | £100.00 |
| Orders of £400 or more | £150.00 |
By selecting Rush Processing, we prioritise your VHS digitisation order and aim to complete the entire process, from receipt of your Memory Box at our lab to dispatch of your completed order, within an expedited timeframe of just 1 to 2 weeks, compared to our standard 3-4 week timeframe. You can easily select the Rush Processing option during the online order placement process if required.
Do you offer any discounts or reduced pricing for larger, bulk VHS tape digitisation orders?
A: Yes, we are pleased to offer generous bulk discounts for larger VHS tape digitisation orders. We believe in rewarding our customers who entrust us with larger collections of memories, and the more tapes you choose to convert, the more you will save overall! Our tiered discount structure is as follows:
| Total Order Spend* | Discount Applied |
|-------------------|------------------|
| £50 or more | 10% |
| £100 or more | 15% |
| £200 or more | 20% |
| £300 or more | 25% |
| £400 or more | 30% |
*Please note that the discount is applied to your total digitisation service spend, excluding any Rush Processing fees if selected. These bulk discounts are automatically calculated and clearly displayed in our user-friendly online quote tool as you add more VHS tapes to your order. You will always see the total savings reflected in your order summary before you proceed to the secure checkout.
What exactly is included within the Free Memory Box that you provide?
A: Our Free Memory Box is thoughtfully designed to be your complete, all-in-one solution for safely and securely sending us your VHS tapes for digitisation. It includes all of the following essential components:
* Robust Crush-Proof Box: A highly durable, reinforced cardboard box specifically engineered to provide maximum protection for your delicate VHS tapes during transit, minimising any risk of physical damage.
* Comprehensive Welcome Guide: A clear, step-by-step instruction guide is included, providing you with easy-to-follow directions on how to properly pack your VHS tapes and how to conveniently arrange the free courier collection.
* Pre-Paid Return Shipping Label: A pre-addressed and pre-paid return shipping label is included within the Memory Box, ensuring hassle-free and cost-free return shipping of your original VHS tapes and your newly digitised media back to you after processing.
* Tape Identification Stickers & 'Name-It Sheet': We provide helpful tape identification stickers and a 'Name-It Sheet' to assist you in organising and labelling your VHS tapes. This enables us to create personalised digital file titles for your videos, making it easier for you to locate and share specific memories once digitised.
The Memory Box itself is delivered to you completely free of charge (secured with just a £10 deposit to initiate your order) and is meticulously designed to offer maximum convenience and superior protection for your precious VHS memories throughout the shipping and digitisation process.
What is the typical standard processing turnaround time for VHS digitisation orders?
A: Our typical standard processing turnaround time for VHS digitisation is generally 3-4 weeks, calculated from the date your Memory Box securely arrives at our dedicated digitisation lab. This carefully considered timeframe allows us to perform a comprehensive range of essential services to the highest standards, including: thorough initial inspection of each tape, professional cleaning and restoration procedures, high-quality digitisation using broadcast-grade equipment, stringent multi-stage quality control checks, and secure, tracked return shipping of your original VHS tapes along with your chosen digital media. We are firmly committed to consistently delivering the highest possible quality results for every customer and take the necessary time and meticulous care to ensure your cherished memories are preserved to the absolute best possible standard.
Is it possible for me to track the progress of my VHS digitisation order once it's been placed?
A: Yes, absolutely! We provide real-time, comprehensive tracking for your VHS digitisation order from start to finish. As soon as your Memory Box is securely collected by our courier partner, you will automatically receive a unique order tracking link directly via email. This dedicated tracking link enables you to monitor your tapes' journey and progress every step of the way – from initial arrival at our specialist lab, through each stage of the digitisation process, right through to final dispatch and secure delivery back to your address. You can conveniently check the real-time status of your order at any time online, 24/7, or alternatively, you can contact our friendly customer support team for any assistance or updates you may require.
How do you provide a guarantee for the ongoing security of my VHS tapes and the privacy of my digital data?
A: We employ multiple robust layers of security and stringent protocols to comprehensively protect your irreplaceable VHS memories and ensure the complete privacy of your digital data throughout the entire digitisation process:
* Robust Physical Security Measures:
* Utilisation of our proprietary crush-proof Memory Box for the safest possible tape transport.
* Partnering with a highly reputable and secure courier service, also trusted for transporting passports and sensitive examination papers.
* Maintaining restricted physical access and implementing 24/7 comprehensive monitoring at our secure digitisation lab facility.
* Enterprise-Grade Digital Data Security:
* Employing secure, enterprise-grade digital storage infrastructure with multiple redundant data backups to prevent any data loss.
* Utilising industry-leading, military-grade encryption protocols for all Cloud Album storage and digital file transfers, ensuring your data remains completely private and protected.
* Meticulous Chain of Custody Tracking:
* Assigning a unique QR code identifier to each individual VHS tape upon arrival at our lab for precise, granular tracking throughout the entire digitisation workflow.
* Implementing continuous, real-time monitoring of each tape's location and processing stage within our secure tracking system.
We have a long-established and proven track record of never losing or damaging a single customer's order and are fully committed to ensuring your cherished memories are always handled with the utmost care and kept completely safe and secure with EachMoment.
What is your policy and process if some of my VHS tapes are found to be blank or unfortunately unplayable?
A: Our policy regarding blank or unplayable VHS tapes is designed to be entirely customer-friendly and transparent:
* Full Refunds for Blank VHS Tapes: If, upon thorough assessment at our digitisation lab, a VHS tape is definitively found to be completely blank and containing no recorded content, you will automatically receive a full refund for the digitisation cost of that specific tape. This refund is processed automatically and without any need for you to request it.
* Refunds for Unplayable VHS Tapes (Rare Cases): In the extremely rare instance (less than 1% of all cases) that a VHS tape is found to be severely damaged and unfortunately unplayable despite our best professional restoration efforts, we will also issue a full refund for the digitisation cost associated with that particular unplayable tape. In such rare cases, we will always proactively contact you to fully discuss the situation and explain the circumstances before processing any refunds for unplayable tapes, ensuring complete transparency and open communication.
We are committed to maintaining complete transparency and fairness in our pricing, ensuring you only ever pay for successfully digitised and valuable content.
Do you currently offer your VHS to digital conversion services to customers located outside of the United Kingdom?
A: Currently, our standard VHS to digital conversion service, which includes the complimentary Memory Box and the 3-way secure courier service, is primarily offered to customers residing within the United Kingdom. For international customers located outside of the UK who are interested in utilising our professional VHS to digital conversion services, we kindly request that you contact our dedicated customer support team directly. You can reach us via email at hello@eachmoment.co.uk or by phone on 01603 361 584. Our team will be happy to discuss potential service options that may be available for international orders and provide you with detailed information regarding any associated international shipping costs or logistical considerations for preserving your VHS memories with EachMoment.
Is it possible for me to order additional copies of my digitised VHS videos on USB drives or DVD sets?
A: Yes, absolutely, it is very easy to order additional copies of your newly digitised VHS videos on either USB drives or DVD sets. Ordering extra copies is a popular option for many of our customers for a variety of reasons, including: conveniently sharing your precious memories with multiple family members and friends, creating readily accessible backup copies of your digital video files for added security, or for gifting purposes, allowing you to thoughtfully share your family history with loved ones. You can easily specify the number of extra copies you require during the initial online ordering process, directly within our quote tool. Alternatively, if you decide you would like additional copies after your initial order is already complete, you can simply contact our customer support team, and we will be happy to assist you in adding more copies to your order. We offer both our Premium Crystal USB drive and Classic Steel USB drive options for extra USB copies, as well as additional DVD sets, providing you with flexible choices to suit your specific needs and preferences.
Which specific payment methods are accepted for your VHS to digital conversion services?
A: We accept a wide and comprehensive range of payment methods to ensure maximum convenience and flexibility for our valued customers:
* All Major Credit and Debit Cards: We securely accept payments from all major credit and debit card providers, including Visa, Mastercard, and American Express.
* Secure Online Payments via Website Checkout: All online payments are processed securely via our website's encrypted and protected checkout system, ensuring your financial information is always kept safe and confidential.
* Bank Transfers: We can also accommodate direct bank transfers for larger orders or customer preference. Please contact our customer support team to arrange a bank transfer payment.
To initiate your VHS to digital conversion order and receive your complimentary Memory Box, you only need to pay a small £10 deposit upfront. The remaining balance for your order is invoiced conveniently online after we have securely received and professionally assessed your VHS tapes at our digitisation lab. We are committed to providing a secure, straightforward, and user-friendly payment process for every customer.
Is EachMoment equipped to efficiently handle large or bulk VHS tape digitisation orders from customers?
A: Yes, EachMoment is exceptionally well-equipped and fully prepared to efficiently handle VHS digitisation orders of all sizes, including large and bulk orders containing hundreds or even thousands of tapes. We routinely work with families who have extensive home video archives, as well as organisations, businesses, and archives with substantial collections of VHS tapes requiring professional digitisation. Our entire infrastructure, including our proprietary Memory Box system, our robust secure courier network, and our dedicated, high-capacity digitisation lab facilities, is specifically designed to efficiently process high volumes of media while maintaining the highest standards of quality and security. For VHS digitisation orders exceeding 50 tapes, we also provide dedicated project managers to ensure seamless handling, streamlined communication, and consistently smooth processing throughout the entire project. Furthermore, we offer attractive and scalable bulk discounts for larger orders, making it even more cost-effective and efficient to digitise your entire VHS tape collection with EachMoment.
What is your customer refund policy in the unlikely event that I am not completely satisfied with the VHS digitisation quality?
A: We are wholeheartedly committed to ensuring your complete satisfaction with our VHS digitisation service. To demonstrate this commitment, we offer a comprehensive 100% satisfaction guarantee on all VHS to digital conversion orders. If, for any reason whatsoever, you are not fully delighted and satisfied with the quality of your professionally restored and digitised VHS tapes, we sincerely encourage you to contact our dedicated customer support team as soon as possible. We will take every step within our power to thoroughly understand and address your specific concerns and diligently resolve any issues you may have encountered. This may include options such as re-digitising your VHS tapes using alternative equipment or settings, providing your digital videos in alternative output formats, or applying further post-processing enhancements to your digital files. If, after working closely with you to address your concerns, we are ultimately unable to resolve the matter to your complete satisfaction, we will, without hesitation, offer a full refund for your entire VHS digitisation order. Your happiness as a customer and the successful preservation of your precious memories are always our absolute top priorities at EachMoment.
How can I easily get in touch with EachMoment customer support if I have further questions about VHS conversion?
A: Our friendly, knowledgeable, and highly responsive customer support team is readily available and eager to assist you with any questions, queries, or concerns you may have regarding VHS to digital conversion services. You can easily reach us through any of the following convenient channels:
* Direct Phone Line: Call us directly at [01603 361 584](tel:01603 361 584) to speak directly with a helpful customer service representative during our business hours.
* Email Support: Send us an email outlining your questions or concerns to hello@eachmoment.co.uk, and our team will ensure you receive a prompt and detailed response, typically within 24 hours.
* Website Contact Form: Visit our website's dedicated 'Contact Us' page at any time and simply fill out the online contact form with your inquiry. We are committed to responding to all contact form submissions within one business day.
We are here to provide you with comprehensive support, clear guidance, and expert assistance throughout your entire VHS digitisation journey with EachMoment, from your initial inquiry through to the successful preservation of your cherished memories.
What specific types of professional equipment do you utilise for VHS to digital conversion, and why are these choices important for quality?
A: At EachMoment, we are committed to utilising only industry-leading, broadcast-quality equipment for all VHS to digital conversion processes. This unwavering commitment to professional-grade technology is essential to ensure the absolute highest possible fidelity, accuracy, and long-term preservation of your precious VHS memories. Our key equipment components include:
* Professional Broadcast-Grade VCRs (Video Cassette Recorders): We exclusively employ top-tier, broadcast-standard VCRs, such as the JVC SR-W500U Super VHS decks and Sony EV-S9000E 8mm/Hi8 playback systems. These VCRs are meticulously engineered and specifically designed for professional video playback and critical archival applications. They offer demonstrably superior signal processing capabilities, exceptional playback stability, and significantly reduced electronic noise levels compared to standard consumer-grade VCRs. A particularly crucial feature of these professional decks is the integrated Time Base Corrector (TBC). The TBC is indispensable for effectively stabilising the often-unstable video signal originating from aging and potentially degraded VHS tapes. It works by meticulously correcting timing errors, eliminating video jitter, and reducing visual artifacts, resulting in a noticeably clearer, more stable, and higher-quality digital transfer of your valuable VHS content.
* High-Resolution Analogue-to-Digital (A/D) Converters: We utilise only professional-grade A/D converters to accurately capture the analogue video signal directly from our broadcast VCRs and convert it into a pristine digital format. These specialised converters are carefully selected for their exceptionally high bit-depth and ultra-precise sampling rates. This ensures the most accurate and detailed capture of the original video information contained on your VHS tapes, effectively minimising any potential loss of visual quality or subtle nuances during the critical conversion process and faithfully preserving the full detail and colour range of your original VHS recordings.
* Precision Frame-by-Frame Capture Systems: Our advanced digitisation process is based on meticulously capturing each individual frame of your VHS tape sequentially, in a frame-by-frame manner. This highly precise method, in contrast to less accurate real-time capture techniques, allows for granular, frame-level quality control and optimisation throughout the entire digitisation process. Frame-by-frame capture also enables our skilled technicians to apply advanced restoration techniques and targeted corrections with far greater precision and control, resulting in superior quality digital output.
* Industry-Standard DaVinci Resolve Colour Grading Software: We utilise DaVinci Resolve, which is widely recognised as the industry-standard software for professional colour correction, advanced colour grading, and video finishing. This powerful software suite enables our expert technicians to precisely fine-tune the colour balance, contrast levels, and overall brightness of your newly digitised videos. Using DaVinci Resolve, we can effectively revitalise faded colours, correct colour casts, and enhance the overall visual appearance of your digitised VHS footage to closely match the intended look and feel of the original recordings, ensuring a visually stunning and faithful preservation of your cherished memories.
By consistently employing this professional-grade equipment and adhering to our meticulous, multi-stage digitisation process, EachMoment provides an unparalleled VHS to digital conversion service. We ensure that your precious memories are preserved with exceptional clarity, remarkable detail, and accurate colour rendition, safeguarding them for generations to enjoy with the highest possible quality and fidelity.